$5 CAMERA PHONE BRACKET
Way back when, in order to do afocal astrophotography, amateur astronomers had to carefully hand-hold an SLR camera up to the eyepiece of a telescope, and pray that they didn't shake their hands (or the scope) while snapping the shutter. But now? Cameras on smart phones are a great way to easily take photos through the eyepiece of a telescope. But the "keeping the hands steady" part is still an issue - until now.

Small piece of 1/2" thick plywood, about 4" x 3" (100mm x 70mm) - actual size required may vary by phoneAstronomy retailers sell brackets for some smartphones, but not all - and they cost upwards of $50 and $60. This one only needs one hole drilled, some scrap pieces of wood, and a few easily found parts at a hardware or home improvement store in the electrical aisle. Here's what you'll need:
- Small piece of hardwood lumber, 3" x 1.375" x .75" (70mm x 35mm x 20mm)
- 1/4-20 x 1.25"L bolt (metric: substitute M6 x 30mm) x 1 piece
- 1/4-20 wingnuts (metric: substitude M6 or whatever size nut is on hangar - see below) x 2 pieces
- Electrical conduit hangar - exact size required will depend on eyepiece used. For most Plossl eyepieces where the barrel is 1.312" - 1.5" in diameter, a 1-1/4 hangar is sufficient. These are relatively inexpensive (about $1 each), so purchasing several sizes may be a wise choice.
- 2 large rubber bands or ponytail hair ties
OPTIONAL:
- Some builders may wish to use a material to protect their phone and eyepieces. See below under "Options."
- Bluetooth shutter release for camera
Begin by cutting the plywood to size, and cutting the hardwood to a similar width as the plywood piece. Hold your phone on the piece of plywood, and try to determine where the camera would need to be in order to be centered over most eyepieces used (see below for discussion on eyepieces choice).

DO NOT glue the hardwood to the plywood yet!Place your phone on the plywood, and rubber band it in place. Next, hold the hangar next to the hardwood. Then determine the location to glue the hardwood to the plywood by noting where the eyepiece will still have clearance to slide up and down without hitting the plywood. (Photo above is slightly angled; there is actually 1/8" (3mm) of clearance between eyepiece and plywood). For the one I built, the hardwood was 7/16" (11mm) off the edge of the plywood.
Next, look at where the camera is on your phone. The one in the photo has a camera that is centered, but Iphones have offset camera locations. Note that location, and mark where that would be for the hole to be drilled for the hanager. Now take your eyepiece, and determine how much up/down movement is possible to adjust the height relative to the camera.
This is important to get a full frame photo. You want to be able to place the camera right about at the eye relief distance of the eyepiece, but also allow a little 'wiggle room' for adjustments up or down. Note that location on the hardwood for up/down location with the left-right mark for the camera, then drill a 1/4" (6mm) hole there. Glue the hardwood onto the plywood at the predetermined distance from the edge, clamp, and let dry overnight.
The hardware
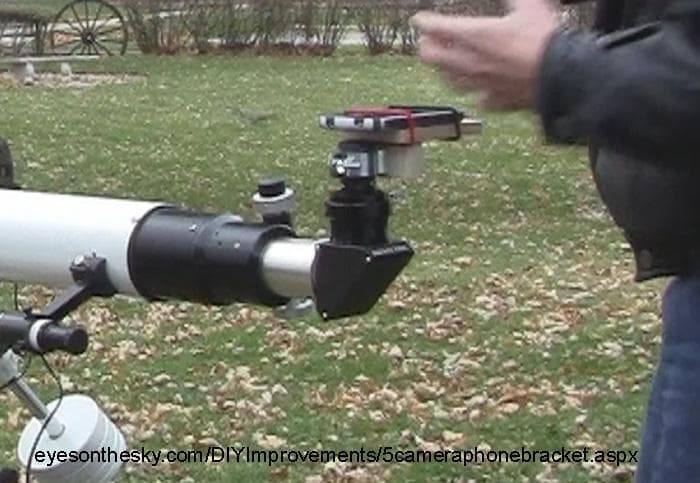
I used a 1-1/4" conduit hangar, that worked perfectly with an Orion Expanse eyepiece. It would have worked well with most any 15mm to 26mm Plossl or Kellner eyepiece also. These hangars normally have a short carriage bolt and a regular hexagonal nut. I replaced that nut with a wingnut. This makes it easy to add or remove the bracket. Then I pushed the 1/4-20 x 1.25" bolt through the hole in the hangar, then through the hole in the hardwood. The wingnut was spun on and tightened up.
Voila! A cameraphone bracket!
One thing I found useful to give the hangar a little better friction and grip on the eyepiece was to bend the wingnut side about 30 degrees or so. That way when the hanger was full clamped in place, the two sides were more parallel; before I did that, the wingnut was awkwardly pressing against a tiny portion of the hangar. See photo below.

I felt a few things were helpful to make the bracket a little better. One was a way to keep from scratching my eyepieces on the hangars and my phone on the plywood. I also wanted something to 'grip' them a bit better. Options
While adhesive-backed felt would be adequate for protection, I found a material called "Gripper Blanket" that is a thin, soft material used to protect hardwood floors from furniture feet. It was located in the section of my home improvement store that has furniture glides. Use it to protect both the phone side of the plywood, and the insides of the conduit hangar to avoid eyepiece barrel scratches. This did add a bit of additional cost - about $4, but to me it was worth it. Felt and contact cement would work too, but probably wouldn't provide the same "grip."
The original Popular Mechanices article where I learned about making this bracket had a "shelf" they used to ensure phones didn't slip off. Not a bad idea - it only requires a small piece of plywood or other wood. Even a couple screws would be sufficient.
About those eyepieces
First, it is much easier to take a very sharp focus picture at a somewhat lower magnification, then improve it with photo-editing software by zooming in as opposed to an always-out-of-focus shot because too much magnification was used. So 32mm, 25mm and 20mm eyepieces are a great focal length to start, especially if they are simpler designs like Plossls or Kellners.
For higher magnifications, it is very hard to get a camera phone centered over a short focal length Plossl (and forget a Kellner or Huygens!). But somewhat more expensive eyepieces that have wider apparent fields of view, such as Orion Expanses (or their clones) are much easier to use for higher magnification shots. The wider field is more forgiving, and it's easier to center the phone.
What to photograph
Afocal astrophotography is best for the Moon, sunspots (with a properly solar filtered telescope) and the brighter planets. It is possible to take photos of bright stars, and some brighter and more colorful ones can be photographed this way. Albireo, Alcor Mizar, Mu Cephei - all are possible. But the larger the telescope, the better. And having a motor drive will make this a FAR less frustrating process. Dob owners will still find it easier to use the bracket, but they will still have to account for Earth's rotation. That's one more reason to use less magnification!
And to reduce those vibrations while taking a photo? Don't touch your phone at all - use a Bluetooth shutter release. I found this one for $4 (at the time I bought it), and it's simple to set up, and allows me to take a photo without touching the phone. Then I can wait for a still moment for the mount and the atmosphere, then trip the release and capture a really great shot.
Try it - for a few dollars, this is a great way to get started taking astrophotos with your telescope and smartphone camera. Here's the video about this telescope smartphone camera bracket.