SUPER SIMPLE TRIPOD 2X4 UPGRADES
For instructions on how to build the Super Simple Tripod 2x4, click here.
To upgrade the Super Simple Tripod 2x4 for various ease of transportation, holding eyepieces and electronics, or for using it as the ground board for your telescope, read on.
As a builder of "things" such as this, I like to make life easier when I transport items, particularly something such as this, which I will use for astronomy outreach opportunities quite often. So the first thing I added to my Super Simple Tripod 2x4 was a handle, and a way to keep the legs from flopping around when carrying/transporting it. Keeping the legs in place makes determining the handle location easier, so let's star there.
I just used two rather simply hooks, and a short bungee cord. I didn't want the hooks to get bent, so I did drill holes for them about 8 inches up from the ground, so I - and others around the tripod - would not inadvertently kick them in the dark. The bungee cord is about 12 inches in length, and just wraps around all three legs and hooks onto the other hook. As you can see in the picture below, the cord is easily stored while the tripod is in use.

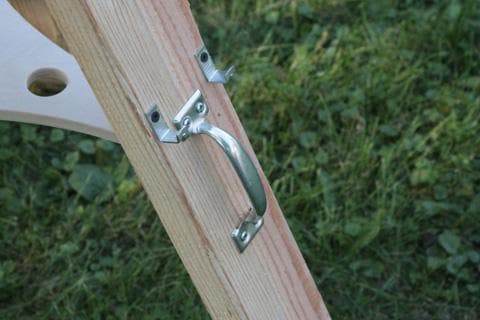
Next, I needed to determine where to place the handle, so that the tripod would largely remain level while I was carrying it. I tied the legs together with the bungee cord, then picked up the tripod with one hand on one leg to determine the right balance spot. I marked that with a pencil, and then drilled holes for a comfortable carrying handle. I spent a bit more on this one, as it has a wider surface which makes it nice to carry for long distances. But a smaller handle will do - it really depends on your budget and what you're okay with holding when carrying the tripod.

I used to use a laptop when observing, and for those who still do, a simple enough modification of either a few large angle brackets or a wood brace may be able to be worked up to hold one. But many people are tablet owners now. I have a Google Nexus 7, which for me is the perfect blend of size, weight, and portability (I can stick the thing in my back pocket if need be). But I found I really missed having a convenient place to park the tablet when observing, and the eyepiece/tripod brace was often not satisfactory. Balancing it on there - sometimes precariously - was not my idea of how to treat a $250 piece of electronics that could break if it hit a rock or the pavement.
So I bought six, $0.47 angle brackets, and bent one end of them where the screw hole is. I used a grinder to take off the sharp edge on the corner, but these can be easily filed down too. Next, I determined how far down the tripod legs I wanted to have the Nexus set. They had to be far enough down that I could also place the table on them while I had it in its protective zippered case. Once I determined that, I simple marked the holes on each tripod leg, and screwed the brackets in place. Now, no matter where I am around the telescope, I can quickly place the tablet, or grab it easily to refer to a star chart. This is such an improvement over my previous methods of doing this. Got a different idea? Go for it! The 2x4's provide plenty of support to hold a lot of weight and other hardware for this kind of thing.

And finally, it is possible to eliminate the original ground board of most tabletop telescopes, apply some Teflon/PTFE bearing surfaces in the right locations, and attach the azimuth section of the telescope directly to the Super Simple Tripod 2x4 (great idea, Jon Isaacs!). I actually had a bit different though for an equatorial way of doing this, but I haven't designed or built it yet.
But this idea is perfectly plausible and workable. Get some Teflon pads from one of the telescope suppliers or an industrial supply house, then attach the pads in the same approximate locations as the groundboard for your scope. You may need to adjust the size of the center hole in your tripod head and bracket, along with getting an appropriate-sized threaded rod. Many telescopes use metric bolts and nuts, though a 3/8-16 threaded rod is just slightly smaller than 10mm bolts. Check your telescope, and adjust the build of your tripod accordingly.
I simply drilled out three holes into the top of my 15" diameter tripod head so I could place the Astroblast 4.5's feet into them, and not have to worry about the scope being easily nudged off the tripod itself. And, because I have a lot of trees in my yard and often want to move the scope to another location to see a different part of the sky, I can just grab under the tripod head, hook my thumbs over the scope's base, and pick up everything and move it quickly and easily to a new location.
Got other ideas for options you've added to a tripod? Email me and let me know - I may share those ideas here for others.