SUPER SIMPLE TRIPOD 1X3
Free plans for how to make a simple, easy-to-build tripod from 1x3's, plywood and some basic hardware (with instructions and pictures)
The Super Simple 1x3 tripod is an easy, do-it-yourself project that uses a few simple pieces of wood and tools to make a strong, lightweight tripod. It can easily replace many wobbly tripods that come with lots of low-cost astronomy telescopes. For about $25 and a few hours worth of work, this tripod can have you viewing the stars and planets with less frustration and more stability.
Materials:
- 2 - 1" x 3" x 8' boards (look for straight, dense, low-knot pieces of wood)
- 1 - 12" x 24" piece of 5/8" (or at minimum, 1/2") plywood
- 3 - 2.25" hinges (with wood screws)
- 1 - 18" length of 1/4-20 threaded rod
- 3 - 1/4-20 nuts
- 1 - 1/4-20 wingnut
- 4 - 1/4" washers
- 150 grit sandpaper
OPTIONAL:
- 1 - 1/4-20 Tee-nut
- Paint or stain/finish
Tools required
- Straight saw (or chop saw / table saw)
- Coping saw (or jigsaw / sabre saw)
- Drill and drill bits up to 1/4"
- Phillips head screwdriver
- Wrench (crescent wrench or even pliers will do)
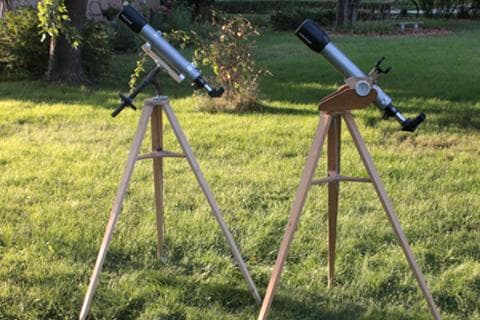
The Super Simple Tripod 1x3 is just that; I simple to build tripod made from simple 1x3's and a little bit of extra wood you may have laying around. And it can be adapted to use for a number of different purposes, such as alt-az mounts, or even making a pipe-mount equatorial mount, as shown on the telescope on the left in the picture above.
Start by cutting the boards to length. For the first two, all you have to do is cut them exactly in half, using a 25 degree cut. REMEMBER that cutting the board in half like that means that you can't cut AT the 48" mark in the middle! You will have to offset it slightly to account for the angled cut. Or, simply cut the longer board to the same length. Now, do the same thing with the second board. You can put the fourth board aside for another project - we will only need three boards.
Next, cut a 5.5" circle into the 3/4" plywood, making sure to mark the center hole (you will need to drill a hole there later). Sand the edges with 150 grit sandpaper. Using this template, mark the position of the screws for the hinges. You may even be able to simply set all three hinges onto your circle so they form an equilateral triangle, and mark the screw positions this way.
Drill pilot holes. Don't skip this step! Drill pilot holes for the screws. Use a small drill bit. This is how the hinges will be arranged when on the circle after the tripod is complete.
Oh yes, and while you've got the drill out, go ahead and drill a 1/4" hole in the center of the 6" circle.
The brace
This is really the heart and soul of this tripod. Without it, the legs just sort of flop around. The tripod is easier to kick over if the brace isn't included. It can fall much more easily.
But WITH the brace, it becomes a whole different structure. The legs become rigid. It even feels strong, despite being quite lightweight overall. And it is a very simple concept: The brace simply turns into place, pushing out on the legs, and engaging them so that the angle portion of the legs push up against the circle at the top.
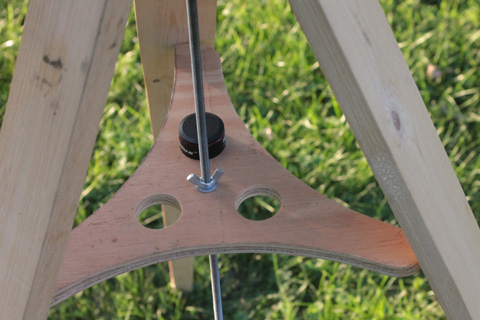
Download this Super Simple Tripod 1x3 brace template. Then cut it out with scissors, and trace the shape onto the larger section of plywood left over from earlier. Be sure to mark the center hole, as that will need to be drilled out later. Using a coping saw (if hand-sawing) or a jigsaw / sabre saw if using power tools, carefully cut out the brace. Then drill the 1/4" hole in the center. (You can optionally draw / cut out 1.25" holes into the brace to hold eyepieces or barlow lenses if you wish, but this will require either a hole saw or a 1.25" Forstner bit.) Sand the edges with 150 grit sandpaper.
Next it is a matter of putting everything together. (You may need to decide how to mount your telescope prior to assembling everything.) Place the circle on the ground, with screw holes facing up. Attach all three hinges. Then lean one of the legs up next to a wall or other object, with the acute angle of the cut legs in towards the hinge. Make sure the angle of the legs is exactly right on - you may need to move the circle a bit so that legs fit and set next to the hinges exactly.
Mark each set of legs for hole placement, then drill pilot holes for each. Attach each leg, then turn the tripod over so it is upright, spreading the legs apart to their furthest reach.
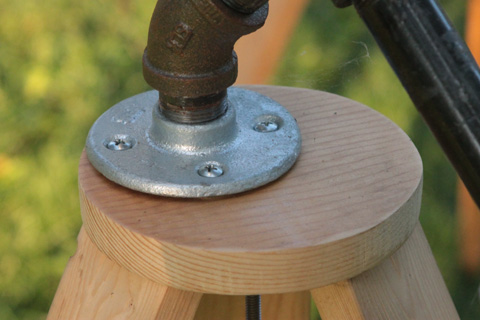
Place a 1/4" nut then a washer onto the threaded rod, and rotate the nut down about an inch. Insert the rod up through the hole in the center of the circle at the top of the tripod, then place a washer and thread another nut on top of that. Tighten these in place. OPTIONAL: Drill out a slightly larger hole and use a /14-20 tee nut, with the "tee" on top of the circle, and thread the rod up into the tee nut, then tighten the nut underneath. This allows for a flatter "top" surface, especially if the tee nut is countersunk slightly using a router or Forstner bit.
Next, thread another nut with a washer underneath it up a ways on the rod, from the bottom. Slide the brace up, then place another washer and then the 1/4-20 wingnut up underneath it. Push the brace so that it presses against all three legs simultaneously, near the middle of each one. Thread the wingnut up until it holds the brace in place, and keeps the legs pushed outwards. Then lower the other 1/4-20 nut down onto that. You can adjust the tension on the brace or lock it in place by applying more force to the wingnut if needed.
And that's it!
A fully functional, more sturdy, less vibration-prone astronomy tripod for lightweight telescopes!
There are a few ways that you can make your tripod slightly more functional or pretty if you like. Before screwing the legs onto the hinges, I tapered the legs of mine slightly. This is more cosmetic than anything; it might even make the tripod a tad more wobbly, but since the scopes I have on mine are only about 3 or 4 pounds each, it really doesn't affect viewing.